So I was scrolling through my phone last week looking at all these fancy Christmas photo setups, and I’m thinking “there’s gotta be a way to get that glow without dropping half my paycheck at Target.” Then it hit me : my front porch is literally sitting there being all basic when it could be serving main character energy for the holidays.
This whole thing started when my cousin showed me her holiday photos from last year. She spent like $300 at some fancy studio and the backdrop looked like something I could totally recreate with stuff from the dollar store and a little creativity. So I started experimenting, and now I’m basically the unofficial Christmas photo booth queen of my neighborhood.
The Snowflakes and Snowmen Wonderland

This one makes me feel like a kid again every single time. Remember those paper snowflakes we used to make in elementary school? We’re bringing that energy but making it chic. I grab a white or blue backdrop , even a cheap plastic tablecloth from the dollar store works , and hang it up behind my porch area. Then comes the fun part: making snowflakes out of white paper and hanging them on fishing line or clear thread at different heights.
What works is making them different sizes and hanging them at varying lengths so it actually looks like snow is falling. I learned this from watching my niece’s school play , they had this amazing winter scene that was literally just paper and string, but it was so enchanting. Add some white cardstock snowmen with little paper hats and carrot noses, and you’ve got yourself a winter wonderland that cost maybe twenty bucks total.
The LED spheres are where things get really special though. I found these battery-operated ones at the hardware store, and they make everything look like it’s glowing from within. It’s giving Frozen vibes but make it budget-friendly.
Fairy Light Dreams
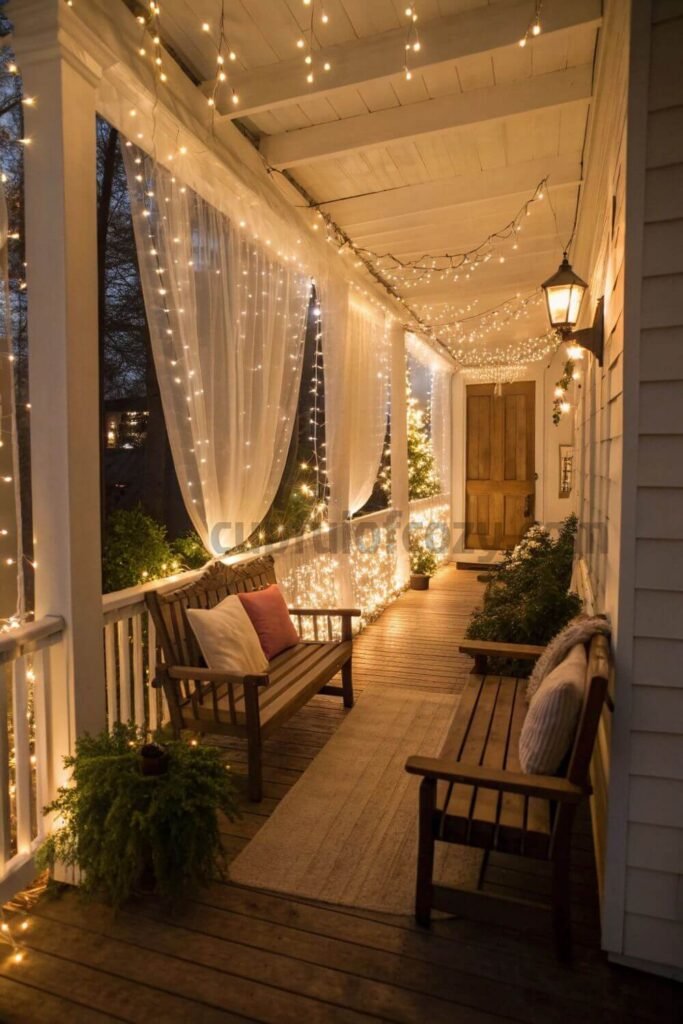
If there’s one thing that can instantly make any space feel cozy and wonderful, it’s fairy lights. I’m talking about those warm-toned LED strings that make everything look like a Pinterest board came to life. String them across your porch ceiling, wrap them around posts, stuff them in mason jars , go wild with it.
I use a cream or white backdrop for this setup because it makes all those little lights reflect and create this dreamy, glowy effect. My neighbor actually stopped by when I was testing this out and said it looked like something from a movie. You can find fairy lights at literally any store now, and they’re so cheap. I picked up five strings from the grocery store for like fifteen dollars.
The fairy light trees are my secret weapon though. You can make them by wrapping lights around tomato cages or even just bundling them up in cone shapes. It adds dimension to your photos and makes the whole space feel enchanted.
Quick and Easy Curtain Lights Setup
Sometimes you need something that looks incredible but can go up and come down fast , especially if you’re dealing with unpredictable weather or nosy HOA people. Curtain lights are your best friend for this. You literally just hang them from your porch ceiling or attach them to a backdrop stand, and boom : instant photo booth.
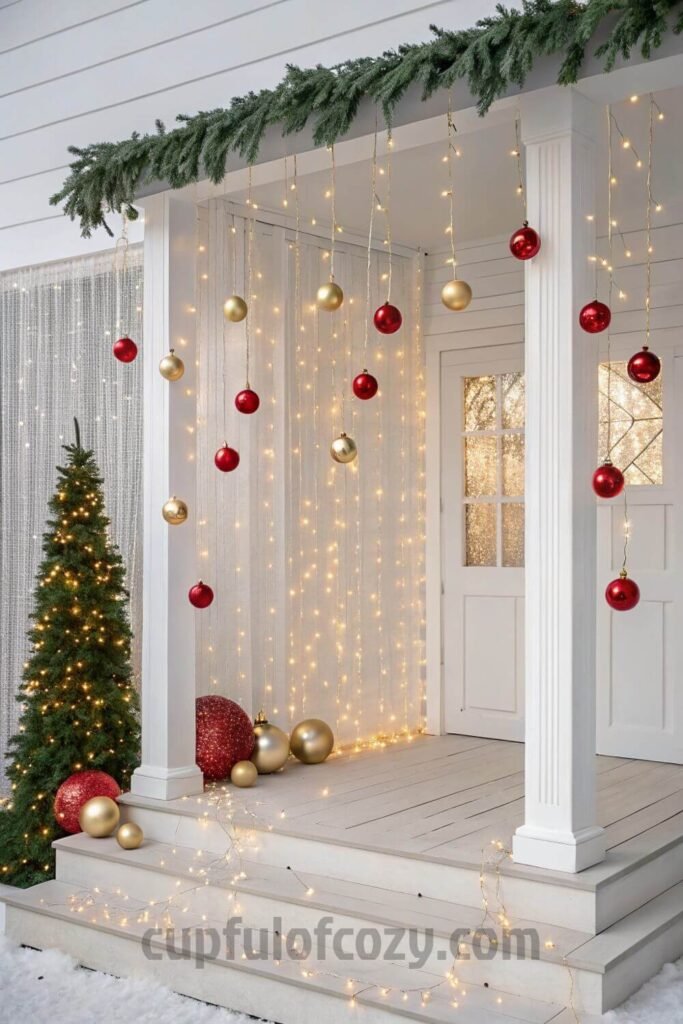
I love weaving Christmas ornaments between the light strands. It adds color and texture without being too much. Plus, you can use all those random ornaments that don’t quite fit on your tree anymore. It’s like they finally found their purpose, which honestly makes my organized heart happy.
The Christmas Tree Centerpiece Setup
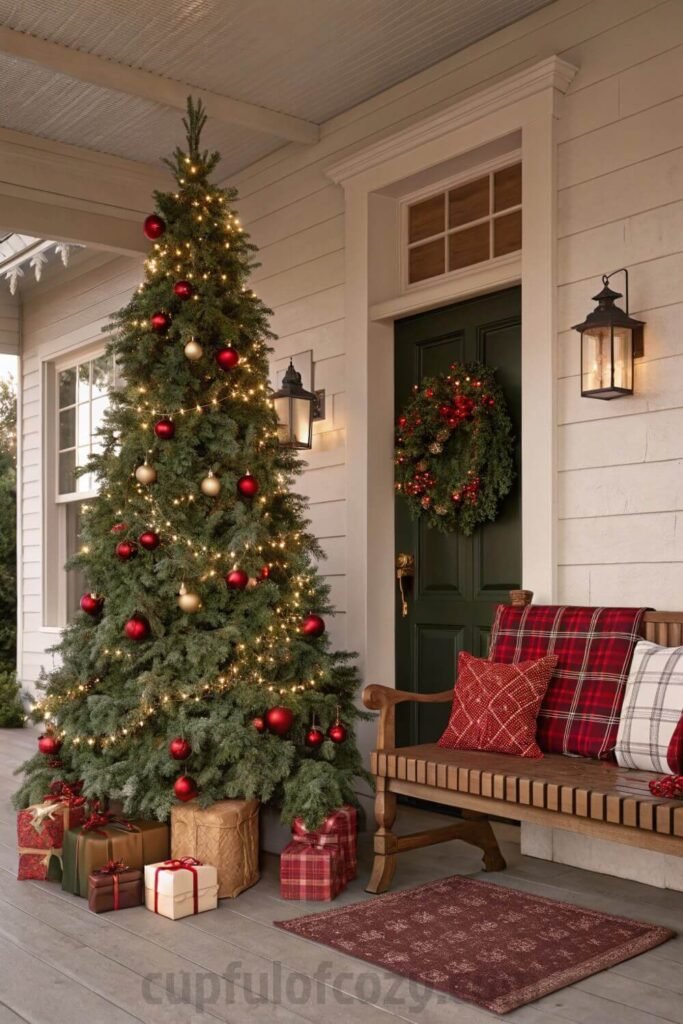
This one hits different because it feels so homey and traditional. I use an artificial tree , not gonna lie, I got mine from a garage sale for ten dollars and it’s been serving looks for three years now. Place it slightly off-center on your porch and surround it with wrapped empty boxes as presents, some garland draped around, maybe a cozy bench or that old rocking chair that’s been sitting in storage.
What matters is making it feel lived-in, like this is where your family naturally gathers for the holidays. I learned this from my grandma, who always said the best photos happen when people feel comfortable in the space. Add some battery-powered candles for that warm glow, and you’ve got yourself a setup that screams “come sit and stay awhile.”
Gingerbread House Fantasy
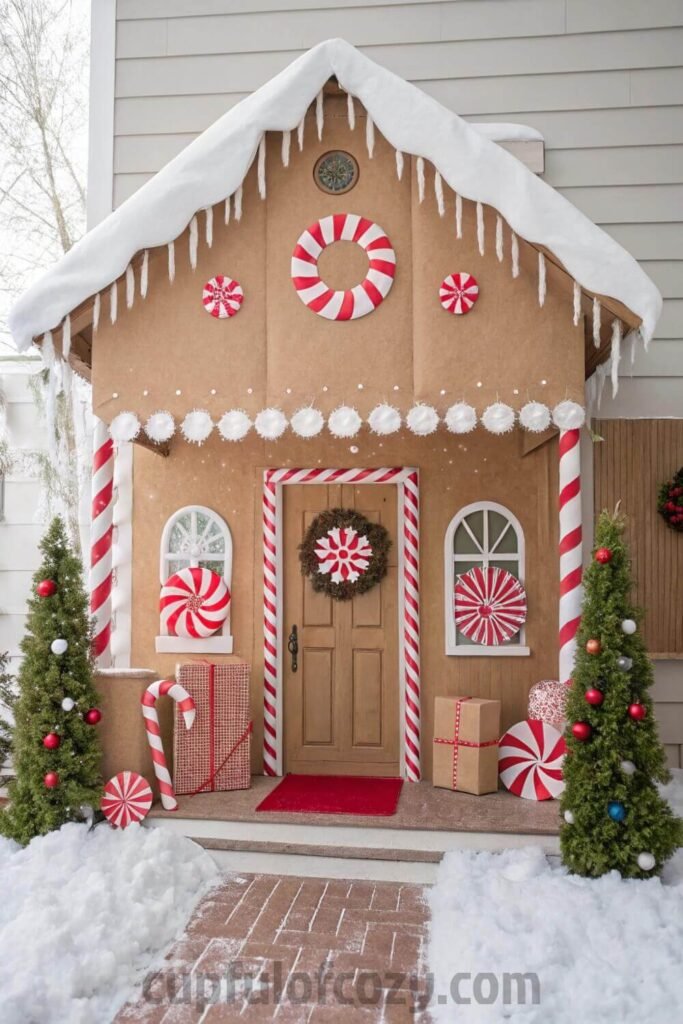
Here’s the thing : this one was inspired by my best friend’s daughter, who’s completely obsessed with gingerbread houses but can never finish eating them. We were looking at all this leftover brown kraft paper from her birthday party, and I had this lightbulb moment , why not make a life-sized gingerbread house backdrop?
Roll out that brown paper and create a house silhouette against your porch wall. Use white cotton batting as “frosting” along the edges, and cut out paper candy shapes to stick all over it. Candy canes made from red and white striped paper or even those foam tubes from the craft store work perfectly. It’s whimsical and sweet, and way more Instagram-worthy than I expected.
My mom always said the best decorations tell a story, and this one definitely does. Plus, it’s sturdy enough that kids can actually touch it without everything falling apart , which is a win in my book.
Glowing Jars and Candlelight Vibes
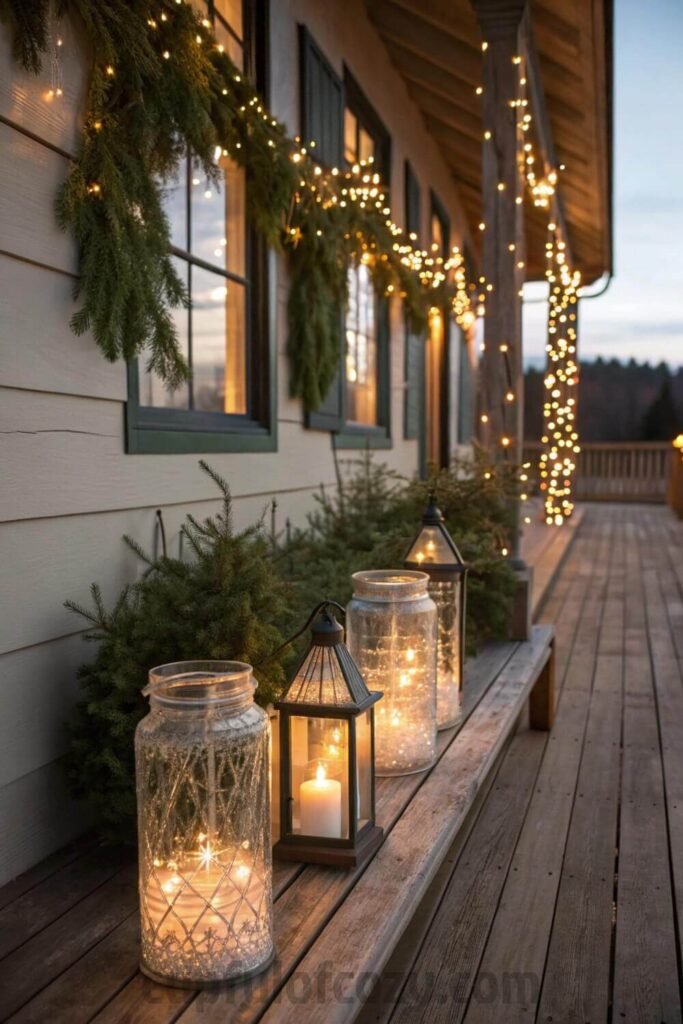
Something about soft, flickering light just makes everyone look like they’re glowing from within. Mason jars with battery-operated fairy lights inside are basically bliss in a jar. Hang them from your porch beams, set them on side tables, line them up on the steps , they work everywhere.
I add some real candles too, but I’m super careful about placement and never leave them unattended. The combination of the steady glow from the LED jars and the gentle flicker of real candles creates this warm, cozy atmosphere that makes people want to linger and take a million photos.
The Wrapping Paper Hack That Changes Everything
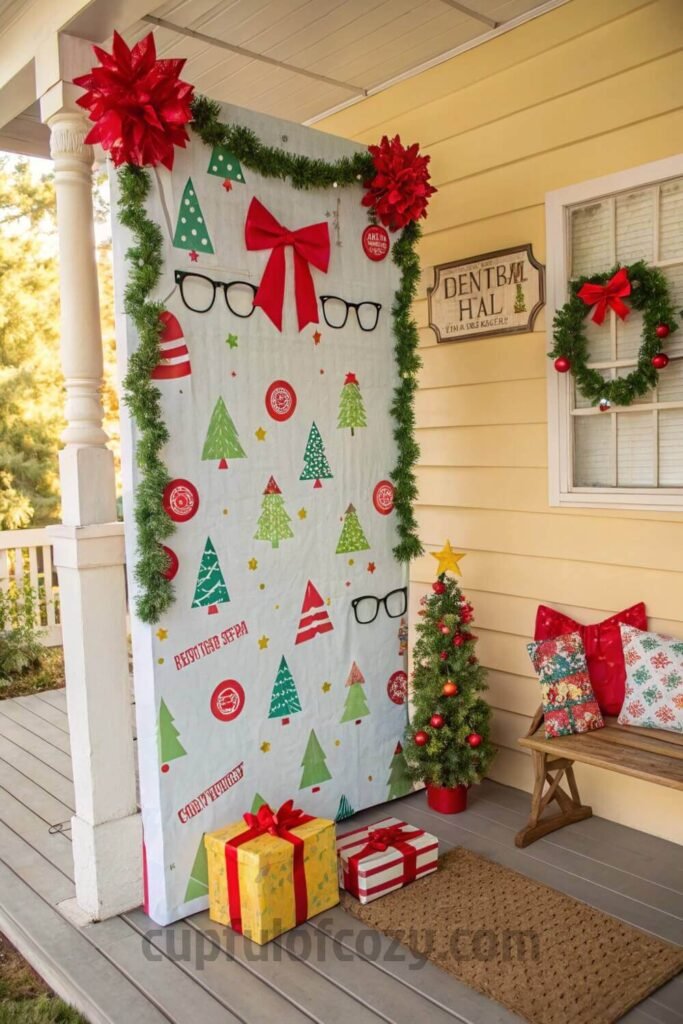
This might be my favorite trick because it’s so simple but looks so intentional. Get a roll of really pretty wrapping paper , I’m talking about the good stuff with metallic accents or beautiful patterns , and tape it vertically to your porch wall as a backdrop.
Then layer on the wonderful details: garland draped across the top, some oversized bows attached at different points, and all those fun dollar store props like Santa hats, reindeer antlers, and silly holiday glasses in a cute basket nearby. It takes maybe fifteen minutes to set up, costs almost nothing, and gives you endless photo opportunities.
What gets me excited about this setup is how versatile it is. You can completely change the vibe just by switching out the wrapping paper pattern. Elegant gold and cream for classy family photos, or bright red and green for fun friend group shots.
Making It All Work Together
Lighting makes or breaks everything when you’re creating a photo booth space. If your porch doesn’t get great natural light, those warm LED lights I keep mentioning aren’t just decorative , they’re essential. They make everyone’s skin look warm and glowy instead of harsh and unflattering.
Keep a stash of fun props accessible but not overwhelming. I use a cute basket or vintage suitcase to corral all the Santa hats, scarves, and silly glasses. It keeps things organized but also adds to the overall aesthetic.
Here’s something I learned the hard way : use zip ties or clear tape for everything. You want your decorations secure, but you also don’t want to damage your porch or spend hours dealing with sticky residue later. Trust me on this one.
Frame your whole photo area with garland or light strings so people naturally know where to stand. It’s like creating an invisible boundary that says “this is the special zone.” Add a bench or chair for different photo options , not everyone wants to stand for every shot, especially when you’re dealing with multiple family members or friend groups.
What I love most about all of these setups is they’re totally reusable. Store everything carefully after the holidays, and next year you can mix and match elements to create something completely new. It’s like having a whole photo studio that fits in a couple of storage bins.
This has become my favorite holiday tradition, no joke. Something so wonderful happens when you create a beautiful space and then watch people light up when they see it. Plus, you end up with amazing photos that actually capture the joy and warmth of the season, not just some sterile studio backdrop.
So grab your dollar store supplies, put on some holiday music, and start creating. Your front porch is about to become the most popular spot in the neighborhood, and your Christmas photos are going to be incredible.
- Before buying anything online, check Rakuten (formerly Ebates) — either with the browser extension or directly on Rakuten.com. Just type in your store, click the current deal, and shop as usual. Every purchase earns you cashback that can be mailed to you or sent via PayPal. In today’s economy, even a few dollars back can turn into a Starbucks latte, McDonald’s fries for the kids, or a little treat you don’t have to budget for. If you’ve never used Rakuten before, you’re missing out on free money — and right now, you’ll even get a $30 bonus when you spend your first $30. Click here to sign up and stop letting your online orders steal from you. Click here to sign up and save money!
*Disclosure: This post includes affiliate links. I may earn a small commission if you join Rakuten through my link — but it doesn’t cost you anything extra. In fact, you’ll actually save more!