
Last Christmas Eve, I was standing in my living room at like 11 PM, staring at my tree and feeling kind of disappointed. Don’t get me wrong, it was pretty enough with all the store-bought ornaments I’d collected over the years, but something was missing. It looked exactly like everyone else’s tree, you know? Same glass balls from Target, same basic lights, same predictable sparkle.
Then I remembered this box of craft supplies I’d been hoarding in my closet since my last Pinterest spiral, and something just clicked. What if I made my own ornaments this year? Not just any ornaments, but the kind that would make people stop mid-conversation and ask where I got them. The kind that would catch the light in ways that made my whole living room feel like it was glowing from the inside.
So I stayed up until 3 AM that night, covered in glitter and seed beads, creating these incredible bead-covered ornaments that completely changed how I think about holiday decorating. By morning, my tree had gone from basic department store display to this gorgeous, personalized wonderland that felt so much more like home. Every ornament told a story, every sparkle felt intentional, and when my family came over later that day, they couldn’t stop talking about how stunning everything looked.
The best part? People kept asking if I’d hired someone to decorate, because the ornaments looked so professional and unique. When I told them I’d made everything myself with supplies that cost maybe thirty bucks total, they practically demanded I teach them. That’s when I realized I’d stumbled onto something really special: these techniques that turn ordinary craft supplies into ornaments that rival anything you’d find in expensive boutiques.
I’ve been perfecting these methods all year, trying different bead combinations and techniques during lazy Sunday afternoons when I needed something to do with my hands. Some of these ideas came from my cousin who’s basically a craft genius, others from late-night YouTube binges, and a few from happy accidents when I was just experimenting with leftover supplies. What I discovered is that making your own ornaments isn’t just about saving money or having something to do during cold weekends: it’s about creating pieces that carry memories and personality in ways mass-produced decorations never could.
Every time I look at these ornaments now, I remember exactly where I was when I made them, what music was playing, whether I was stressed about work or feeling excited about the holidays. They’ve become these little time capsules that make decorating feel less like a chore and more like revisiting good memories while creating new ones.
So if you’re tired of having the same tree as everyone else, or if you just want to try something that’ll make your holidays feel more personal and special, these bead and glitter techniques are going to change everything for you. Trust me on this one.
Table of Contents
1. Beaded Star Ornament
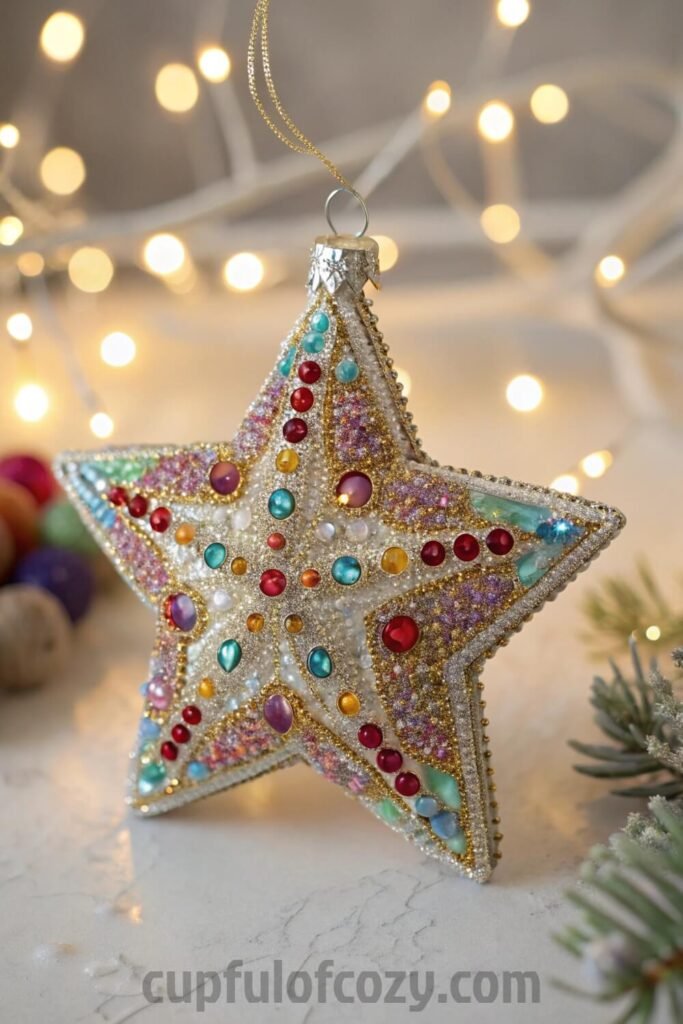
My cousin Maya showed up to our annual Christmas craft night with this bag of tiny beads and announced she was going to teach everyone how to make stars. I’ll be honest, I was skeptical because my fine motor skills aren’t exactly what you’d call refined, but she insisted it was easier than it looked.
She laid out these beautiful Lipsi beads, SuperDuo beads, some longer bugle beads, and these crystal bicones that caught the kitchen light like tiny diamonds. The process became this surprisingly meditative rhythm: thread, position, pull tight, repeat. What started as fumbling with tiny beads turned into this zen-like flow where I lost track of time completely.
Here’s what nobody tells you about making beaded stars: each one develops its own personality. Even when you’re following the exact same pattern, maybe your tension’s a little different that day, or you unconsciously choose slightly warmer toned crystals, and suddenly you’ve got this collection where every star feels handcrafted and one-of-a-kind. They look incredibly intricate hanging on the tree, catching light from different angles, but once you understand the basic stringing technique, they’re totally manageable even if you’ve never done detailed beadwork before.
I ended up making twelve that first night, and now they’re scattered throughout my tree like little constellation points. My mom always said handmade ornaments were the heart of a beautiful tree, and she was completely right.
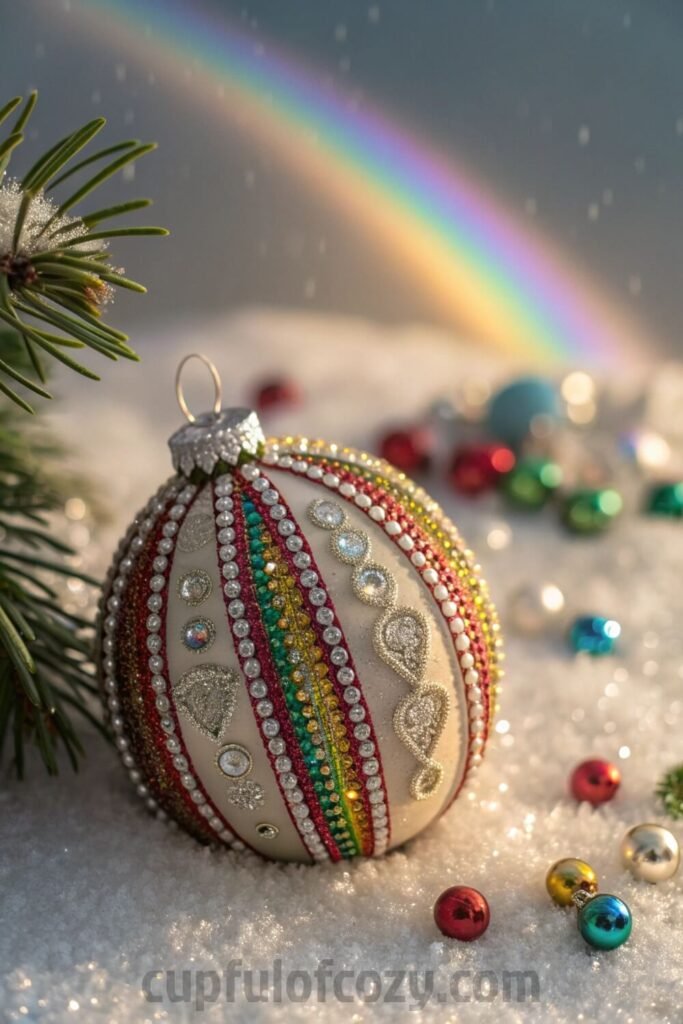
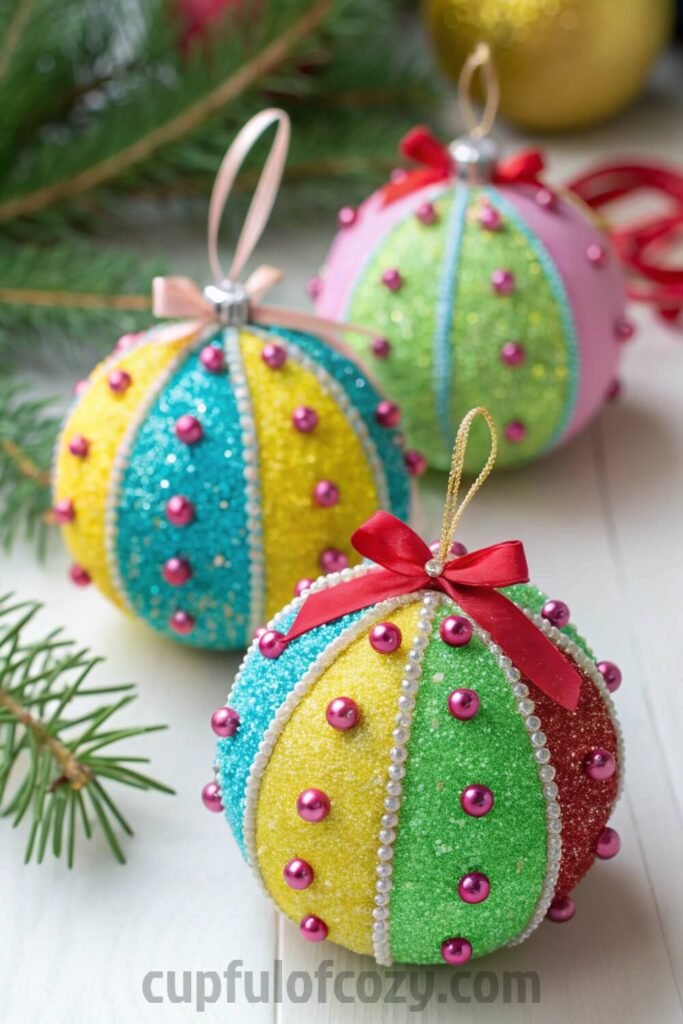
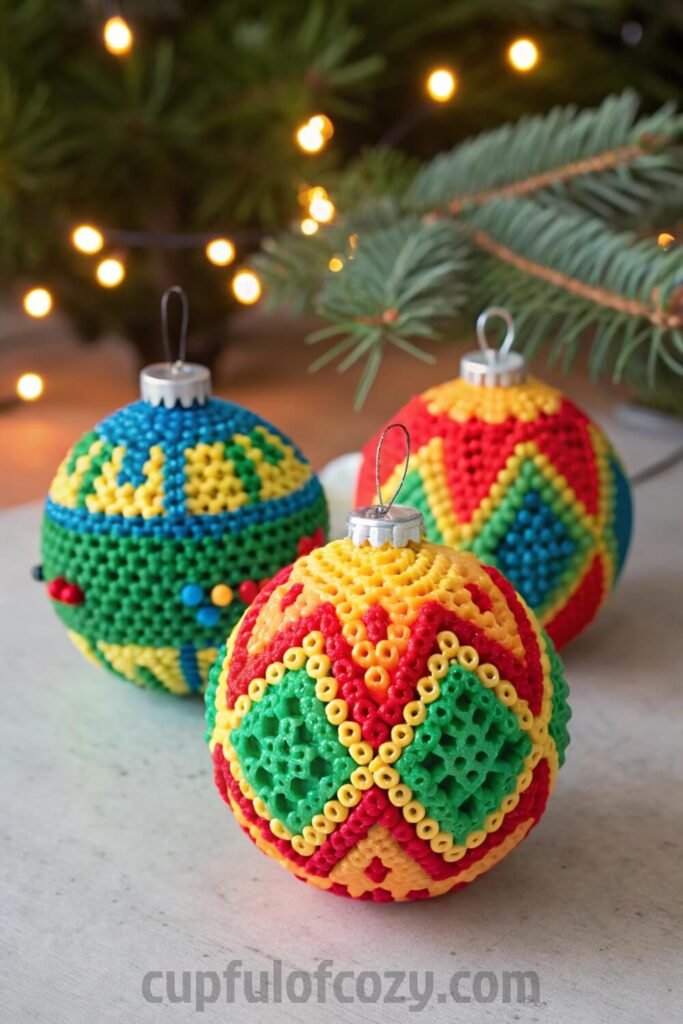
2. Beaded Christmas Ball Ornament
- Before you hit “buy” on your next decor order, there’s a free 10-second step you should never skip: checking Rakuten (Ebates). I simply find the store name, click the deal, and shop like normal, and Rakuten sends me real cashback! Prices keep climbing everywhere, but this is one way to get a little back on the things you were going to purchase anyway. New members even get a $30 bonus when they spend $30 — which means your first order could pay you back instantly. Don’t miss out again. Click here to sign up and save money!
*Disclosure: This post includes affiliate links. I may earn a small commission if you join Rakuten through my link — but it doesn’t cost you anything extra. In fact, you’ll actually save more!
This is where I completely went overboard last December, and I have zero regrets about it. Starting with plain glass ball ornaments, I began carefully stringing beads around them in patterns that grew more complex as I got comfortable with the technique. Some nights I’d sit on the couch watching holiday movies, just slowly building up layers of color and texture on these spheres.
The experimentation became addictive. I made some in all silver and crystal that looked like frozen dewdrops, others with deep burgundy and gold that felt rich and vintage, and my absolute favorite: this gorgeous gradient that shifts from deep purple at the top to silver at the bottom. Each one took hours, but it was the kind of meditative work that made stressful December evenings feel peaceful.
Getting that first foundation layer of beads secured properly is crucial, but once you’ve got that base, you can layer different colors, add metallic accents, or press crystal beads into still-drying glue for extra dimension. When these catch the tree lights, they create these amazing pools of colored light on the walls that make the whole room feel enchanted.
3. DIY Pool Noodle Ornament Cluster
I discovered this technique during one of those late-night Pinterest sessions when I should’ve been sleeping but kept clicking “just one more idea.” By the following Saturday, I was at Dollar Tree buying pool noodles in December like some kind of holiday craft lunatic, getting weird looks from other shoppers who clearly thought I’d lost my mind.
Here’s how it works: you cut a section of pool noodle, push a broomstick through the center as your mounting base, then start gluing various sized Christmas ball ornaments all around it until you’ve created this clustered dome shape. The key is varying your ornament sizes and leaving just enough space between them so each one can catch light individually while contributing to the overall sparkle effect.
My version ended up mostly silver and white with scattered deep blue ornaments, and it became this gorgeous centerpiece that sits on my dining table all season. The way it catches candlelight during dinner parties makes everything feel so much more elegant. When my neighbor Karen saw it, she immediately asked where I’d bought such a sophisticated piece, and when I told her I’d made it from pool noodle supplies, her jaw literally dropped.
4. Variety of Beaded Ornament Patterns
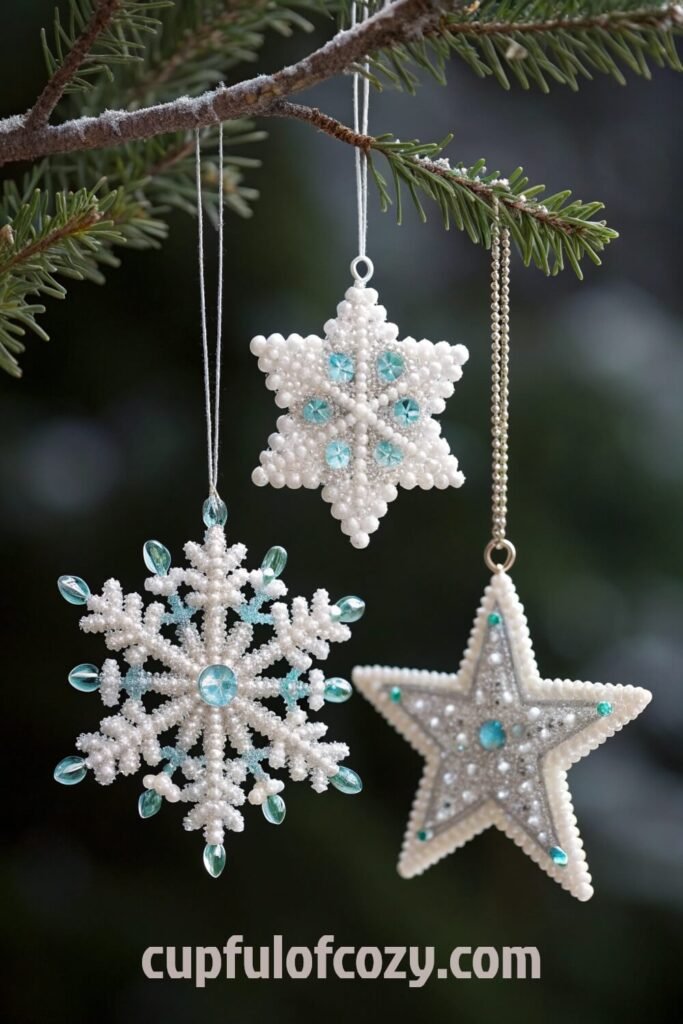
Once you make your first beaded star, you’ll want to create everything else too. It’s like opening a door to this whole world of possibilities. I’ve made snowflakes with intricate geometric patterns, chunky little snowmen with personality, and more star variations than I can count. Glass seed beads became my go-to because they’re small enough for detailed work but create incredible light reflection, though colorful plastic beads work beautifully if you want something more playful and kid-friendly.
The snowflakes especially create these dancing light patterns around the room when your tree lights hit them just right. I love watching people notice them for the first time: they’ll be talking normally, then suddenly stop mid-sentence because they’ve realized these aren’t store-bought ornaments but these detailed, delicate pieces that someone actually crafted by hand.
What gets me excited about this variety approach is how you can theme different sections of your tree. Maybe cluster all your blue and silver beaded pieces in one area, scatter the warmer tones throughout, or create this graduated effect where colors blend from one section to another.
5. Glitter Foam Sheet Ornaments
My eight-year-old niece Lily and I stumbled onto this during a particularly ambitious Saturday afternoon when we’d burned through all our regular ornament supplies but still had creative energy to spare. Glitter foam sheets are basically craft supply gold: they come pre-loaded with sparkle, hold their shape when you cut them, and they’re forgiving enough that even less-than-perfect cuts still look intentional.
We cut them into ball shapes, layered different colors together, then added ribbon details and small beads that made them look way more expensive than their dollar store origins. The foam is lightweight so it won’t bend your tree branches, and there’s no glass to worry about if you’ve got kids or pets around who might knock things off lower branches.
What surprised me was how sophisticated these ended up looking. Lily chose this combination of deep red glitter foam with gold accents that could’ve come from an upscale department store display. She was so proud showing them off to her mom later, and honestly, they deserved the attention.
6. Clear Plastic Ornament with Twine & Felt Balls
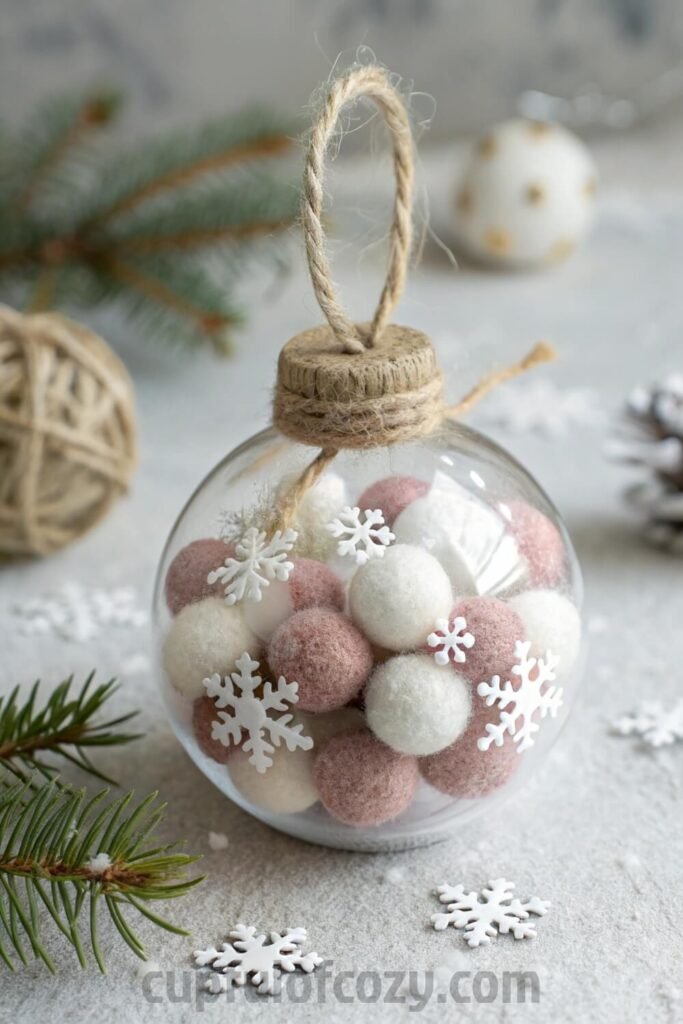
This combination happened purely by accident when I was trying to use up leftover supplies from other projects cluttering my craft closet. I had clear plastic ball ornaments left from last year, some natural twine I’d bought for a failed macrame attempt, and this bag of felt balls in winter colors that I’d bought impulsively and then forgotten about.
Started wrapping the twine around the ornament in crossing patterns, not really following any plan, just seeing what looked good. Then I dropped the felt balls inside along with some tiny paper snowflakes I’d cut from old sheet music, and suddenly I had this incredibly textural ornament that looked like something from an expensive craft fair.
The twine gives it this cozy, cabin-in-the-woods feeling while the felt balls and snowflakes create this miniature winter scene that’s different from every angle. People always pick these up to examine them more closely, trying to figure out how all the elements work together so perfectly.
7. Glitter and Seed Beads on Glass Ornaments

Taking those same plain glass balls and giving them the full glitter treatment became my Sunday afternoon therapy last winter. There’s something incredibly satisfying about painting careful lines of craft glue or Mod Podge onto smooth glass, then watching it come alive as you roll it in fine glitter or press tiny seed beads into the wet adhesive.
I experimented with different pattern approaches: some geometric and precise, others more organic and flowing like watercolor washes. Layering different glitter colors with seed beads creates this amazing depth that shifts and changes as light hits it from different angles. The texture you get from this combination makes each ornament feel like a tiny jewel hanging on your tree.
My favorite technique became painting loose spiral patterns with the glue, then alternating between fine silver glitter and clear seed beads as I worked my way around the sphere. The result looks like captured starlight.
8. DIY Glitter on Plexiglass Balls
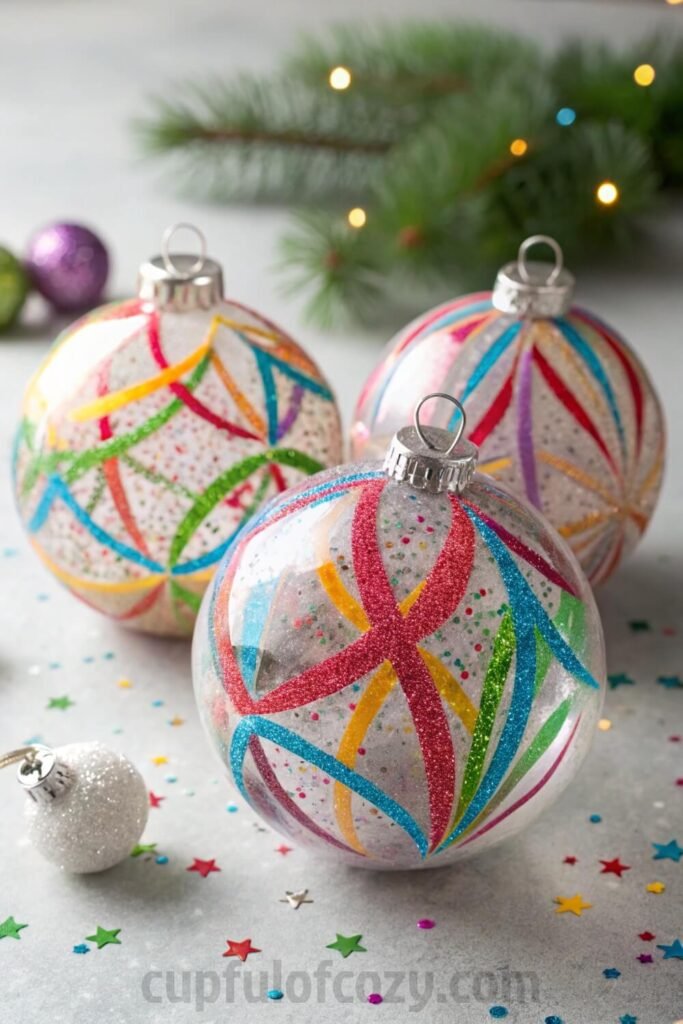
Plexiglass ornament balls changed my crafting game because they’re practically indestructible, which means you can get adventurous with your decorating without worrying about accidents. Glitter glue becomes your best creative tool here: you can paint patterns, cover entire surfaces, or create those gorgeous ombre effects that look professionally done.
I made an entire set in different metallic tones: some copper that glows like embers, others in silver that feels crisp and wintery, and a few in this incredible iridescent glitter that shifts colors depending on the light. They create cohesive visual flow on the tree while each one maintains its own personality.
Storage became so much less stressful too. Instead of carefully wrapping each ornament in tissue paper and praying nothing breaks during the eleven months they spend in the closet, I can just toss these in a container and know they’ll be perfect next year.
9. Sequin and Beaded Balls
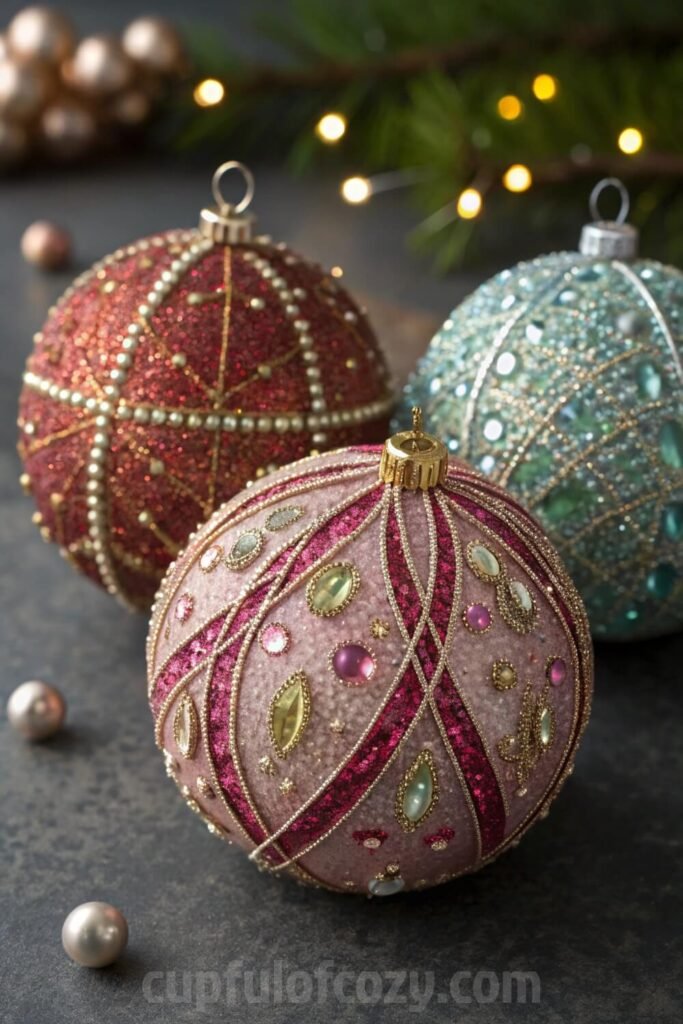
My friend Sarah, who has this incredible eye for combining textures in unexpected ways, introduced me to this technique during a wine and craft night that got way more productive than either of us expected. The idea is to layer sequins and beads on basic ball ornaments until they look like something from a luxury hotel lobby display.
The layering strategy makes all the difference: start with larger sequins as your foundation, then add progressively smaller ones to fill gaps, finishing with seed beads to catch light in areas the sequins might miss. The amount of movement and sparkle you get from this combination is incredible: every little air current makes them shimmer differently, and they photograph beautifully if you’re into creating that Instagram-worthy tree situation.
Sarah made hers in all gold tones, while I went with silver and blue combinations that feel like winter moonlight. The techniques the same, but the color choices completely change the mood and style.
10. Perler Bead Christmas Ornaments
Perler beads brought back so many childhood memories of rainy afternoons spent at my grandmother’s kitchen table, carefully arranging tiny plastic beads on pegboards before she’d iron them into permanent shapes. Turns out you can use that same nostalgic craft technique to create amazing textured ornament covers.
The process is wonderfully meditative: arrange your Perler beads into snowflake patterns, geometric designs, or even spell out names and dates on the pegboards, then fuse them together with heat. Once they’re cool and set, you can attach these flat designs to ball ornaments to create really unique three-dimensional effects that catch light in unexpected ways.
These work perfectly if you’ve got kids who want to participate in ornament making, since the technique is familiar and forgiving. Plus, there’s still something deeply satisfying about hearing those beads melt and fuse under the iron, creating something permanent and beautiful from loose pieces.
My nieces made personalized ones with their names in different colors, and now those ornaments have become treasured pieces that mark specific years and ages in our family Christmas collection.
Final Thoughts
The incredible thing about creating your own ornaments is how each piece becomes a memory keeper. Every time December rolls around and you start pulling out decorations, you remember the evening you spent stringing beads while snow fell outside, or the afternoon your friend taught you a new technique over coffee and cookies. Your tree stops being just another decorated holiday display and starts telling the story of creative moments, shared time, and the satisfaction that comes from making beautiful things with your own hands.
Once you’ve experienced the joy of hanging ornaments that carry personal history and reflect your own creative choices, store-bought decorations start feeling a little hollow. Why settle for mass-produced sparkle that looks like everyone else’s when you can create something that’s uniquely yours, tells your story, and brings genuine joy every time you see it catching the light?
- Before buying anything online, check Rakuten (formerly Ebates) — either with the browser extension or directly on Rakuten.com. Just type in your store, click the current deal, and shop as usual. Every purchase earns you cashback that can be mailed to you or sent via PayPal. In today’s economy, even a few dollars back can turn into a Starbucks latte, McDonald’s fries for the kids, or a little treat you don’t have to budget for. If you’ve never used Rakuten before, you’re missing out on free money — and right now, you’ll even get a $30 bonus when you spend your first $30. Click here to sign up and stop letting your online orders steal from you. Click here to sign up and save money!
*Disclosure: This post includes affiliate links. I may earn a small commission if you join Rakuten through my link — but it doesn’t cost you anything extra. In fact, you’ll actually save more!